
Chrome扩展指的是通过调用 Chrome 提供的 Chrome API 来扩展浏览器功能的一种组件,工作在浏览器层面,使用 HTML + Javascript 语言开发[*]。比如著名的 Adblock plus。
1、Chrome插件与Chrome扩展的区别?
完整的扩展可以在这里下载。
Chrome扩展
扩展(Extension),指的是通过调用 Chrome 提供的 Chrome API 来扩展浏览器功能的一种组件,工作在浏览器层面,使用 HTML + Javascript 语言开发[*]。比如著名的 Adblock plus。
Chrome插件
插件(Plug-in),指的是通过调用 Webkit 内核 NPAPI 来扩展内核功能的一种组件,工作在内核层面,理论上可以用任何一种生成本地二进制程序的语言开发,比如 C/C++、Delphi 等。比如Flash player 插件,就属于这种类型。一般在网页中用 或者 标签声明的部分,就要靠插件来渲染。
2、如何开发一个 Chrome 扩展 ?
既然知道了 Chrome 扩展 是用 HTML + javascript 开发的了,那么我们首先要做的就是要搭建一个前端项目出来。
1、创建manifest
扩展从它们的
manifest开始。创建一个名为manifest.json并包含以下代码的文件。{ "name": "Getting Started Example", "description": "Build an Extension!", "version": "1.0", "manifest_version": 3 }2、在Chrome浏览器添加该扩展
保存清单文件的目录可以在其当前状态下作为开发人员模式的扩展添加。要在开发人员模式下加载解压缩的扩展,请按照下列步骤操作:
1、通过导航到 来打开扩展管理页面
chrome://extensions- 或者,通过单击扩展菜单按钮并选择菜单底部的管理扩展来打开此页面。
- 或者,通过单击 Chrome 菜单打开此页面,将鼠标悬停在更多工具上,然后选择扩展
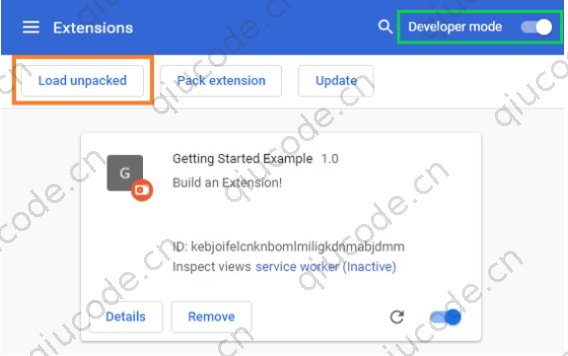
扩展已成功安装。因为清单中没有包含图标,所以将为扩展创建一个通用图标。
3、注册后台脚本
编辑manifest.json文件
{
  "name": "Getting Started Example",
  "description": "Build an Extension!",
  "version": "1.0",
  "manifest_version": 3,
  "background": {
    "service_worker": "background.js"
  }
}
Chrome 现在知道该扩展程序包含一个服务工作者。当您重新加载扩展程序时,Chrome 将扫描指定文件以获取其他说明,例如它需要侦听的重要事件。
4、创建后台脚本
此扩展在安装后将需要来自持久变量的信息。runtime.onInstalled首先在后台脚本中包含一个监听事件。在onInstalled侦听器内部,扩展将使用存储API 设置一个值。这将允许多个扩展组件访问该值并对其进行更新。在扩展的目录中创建一个名为background.js并添加以下代码的文件。
// background.js

let color = '#3aa757';

chrome.runtime.onInstalled.addListener(() => {
  chrome.storage.sync.set({ color });
  console.log('Default background color set to %cgreen', `color: ${color}`);
});
5、添加存储权限
大多数 API,包括存储API,必须"permissions"在清单中的字段下注册,以便扩展使用它们。
修改manifest.json文件
{
  "name": "Getting Started Example",
  "description": "Build an Extension!",
  "version": "1.0",
  "manifest_version": 3,
  "background": {
    "service_worker": "background.js"
  },
  "permissions": ["storage"]
}
6、检查后台脚本
导航回扩展管理页面,然后单击重新加载链接。一个新字段Inspect views可通过蓝色链接service worker 使用。
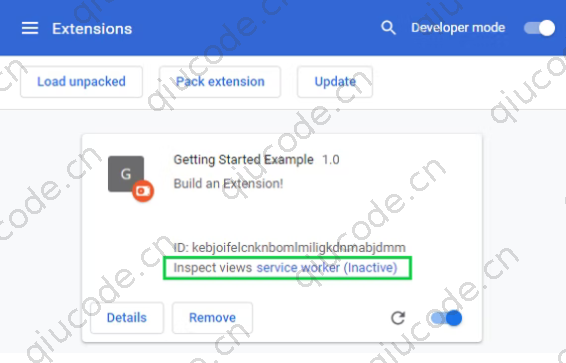
点击链接查看后台脚本的控制台日志,“ Default background color set to green”
7、引入用户界面
扩展可以有多种形式的用户界面;这将使用一个弹出窗口。创建并添加一个名为popup.html扩展目录的文件。这个扩展使用一个按钮来改变背景颜色。
<!DOCTYPE html>
<html>
  <head>
    <link rel="stylesheet" href="button.css">
  </head>
  <body>
    <button id="changeColor"></button>
  </body>
</html>
与后台脚本一样,必须在manifest.json中声明此文件,以便 Chrome 将其显示在扩展程序的弹出窗口中。为此,请将一个action对象添加到清单并设置popup.html为操作的default_popup.
{
  "name": "Getting Started Example",
  "description": "Build an Extension!",
  "version": "1.0",
  "manifest_version": 3,
  "background": {
    "service_worker": "background.js"
  },
  "permissions": ["storage"],
  "action": {
    "default_popup": "popup.html"
  }
}
这个弹出窗口的 HTML 引用了一个名为button.css. 将另一个文件添加到扩展的目录,适当命名,然后添加以下代码。
button {
  height: 30px;
  width: 30px;
  outline: none;
  margin: 10px;
  border: none;
  border-radius: 2px;
}

button.current {
  box-shadow: 0 0 0 2px white,
              0 0 0 4px black;
}
工具栏图标的名称也包含action在该default_icons字段中。在此处下载 images 文件夹,解压缩,并将其放在扩展程序的目录中。更新manifest.json,以便扩展知道如何使用图像。
{
  "name": "Getting Started Example",
  "description": "Build an Extension!",
  "version": "1.0",
  "manifest_version": 3,
  "background": {
    "service_worker": "background.js"
  },
  "permissions": ["storage"],
  "action": {
    "default_popup": "popup.html",
    "default_icon": {
      "16": "/images/get_started16.png",
      "32": "/images/get_started32.png",
      "48": "/images/get_started48.png",
      "128": "/images/get_started128.png"
    }
  }
}
扩展程序还会在扩展程序管理页面、权限警告和网站图标上显示图像。这些图像在清单中指定icons。
{
  "name": "Getting Started Example",
  "description": "Build an Extension!",
  "version": "1.0",
  "manifest_version": 3,
  "background": {
    "service_worker": "background.js"
  },
  "permissions": ["storage"],
  "action": {
    "default_popup": "popup.html",
    "default_icon": {
      "16": "/images/get_started16.png",
      "32": "/images/get_started32.png",
      "48": "/images/get_started48.png",
      "128": "/images/get_started128.png"
    }
  },
  "icons": {
    "16": "/images/get_started16.png",
    "32": "/images/get_started32.png",
    "48": "/images/get_started48.png",
    "128": "/images/get_started128.png"
  }
}
默认情况下,扩展出现在扩展菜单(拼图)中。固定扩展程序将在工具栏中显示图标。
如果在此阶段重新加载扩展程序,它将包含提供的图标而不是默认占位符,单击该操作将打开一个弹出窗口,其中显示一个显示默认颜色的按钮。
弹出 UI 的最后一步是为按钮添加颜色。创建一个以popup.js以下代码命名的文件并将其添加到扩展的目录中。
// Initialize button with user's preferred color
let changeColor = document.getElementById("changeColor");

chrome.storage.sync.get("color", ({ color }) => {
  changeColor.style.backgroundColor = color;
});
此代码从中获取按钮popup.html并从存储中请求颜色值。然后它将颜色应用为按钮的背景。popup.js在 中包含一个脚本标签popup.html。
<!DOCTYPE html>
<html>
  <head>
    <link rel="stylesheet" href="button.css">
  </head>
  <body>
    <button id="changeColor"></button>
    <script src="popup.js"></script>
  </body>
</html>
重新加载扩展程序以查看绿色按钮。
8、逻辑内容
该扩展现在有一个自定义图标和一个弹出窗口,它根据保存到扩展存储中的值为弹出按钮着色。接下来,它需要进一步的用户交互逻辑。popup.js通过将以下内容添加到文件末尾来更新。
// When the button is clicked, inject setPageBackgroundColor into current page
changeColor.addEventListener("click", async () => {
  let [tab] = await chrome.tabs.query({ active: true, currentWindow: true });

  chrome.scripting.executeScript({
    target: { tabId: tab.id },
    function: setPageBackgroundColor,
  });
});

// The body of this function will be executed as a content script inside the
// current page
function setPageBackgroundColor() {
  chrome.storage.sync.get("color", ({ color }) => {
    document.body.style.backgroundColor = color;
  });
}
更新后的代码click向按钮添加了一个事件侦听器,该侦听器触发以编程方式注入的内容脚本。这会将页面的背景颜色变为与按钮相同的颜色。使用编程注入允许用户调用内容脚本,而不是自动将不需要的代码插入网页。
manifest.json将需要activeTab允许扩展临时访问当前页面的scripting权限,以及使用脚本 APIexecuteScript方法的权限。
{
  "name": "Getting Started Example",
  ...
  "permissions": ["storage", "activeTab", "scripting"],
  ...
}
该扩展现在功能齐全!重新加载扩展程序,刷新此页面,打开弹出窗口并单击按钮将其变为绿色!但是,一些用户可能希望将背景更改为不同的颜色。
9、给用户选项
该扩展目前只允许用户将背景更改为绿色。包含选项页面使用户可以更好地控制扩展程序的功能,进一步定制他们的浏览体验。
首先在名为的目录中创建一个文件,options.html并包含以下代码。
<!DOCTYPE html>
<html>
  <head>
    <link rel="stylesheet" href="button.css">
  </head>
  <body>
    <div id="buttonDiv">
    </div>
    <div>
      <p>Choose a different background color!</p>
    </div>
  </body>
  <script src="options.js"></script>
</html>
然后在manifest.json中注册选项页面,
{
  "name": "Getting Started Example",
  ...
  "options_page": "options.html"
}
重新加载扩展并右键单击工具栏中的扩展图标,然后选择选项。或者,单击详细信息并向下滚动详细信息页面并选择扩展选项。
最后一步是添加选项逻辑。options.js使用以下代码在扩展目录中创建一个名为的文件。
let page = document.getElementById("buttonDiv");
let selectedClassName = "current";
const presetButtonColors = ["#3aa757", "#e8453c", "#f9bb2d", "#4688f1"];

// Reacts to a button click by marking the selected button and saving
// the selection
function handleButtonClick(event) {
  // Remove styling from the previously selected color
  let current = event.target.parentElement.querySelector(
    `.${selectedClassName}`
  );
  if (current && current !== event.target) {
    current.classList.remove(selectedClassName);
  }

  // Mark the button as selected
  let color = event.target.dataset.color;
  event.target.classList.add(selectedClassName);
  chrome.storage.sync.set({ color });
}

// Add a button to the page for each supplied color
function constructOptions(buttonColors) {
  chrome.storage.sync.get("color", (data) => {
    let currentColor = data.color;
    // For each color we were provided…
    for (let buttonColor of buttonColors) {
      // …create a button with that color…
      let button = document.createElement("button");
      button.dataset.color = buttonColor;
      button.style.backgroundColor = buttonColor;

      // …mark the currently selected color…
      if (buttonColor === currentColor) {
        button.classList.add(selectedClassName);
      }

      // …and register a listener for when that button is clicked
      button.addEventListener("click", handleButtonClick);
      page.appendChild(button);
    }
  });
}

// Initialize the page by constructing the color options
constructOptions(presetButtonColors);
提供了四个颜色选项,然后在带有 onclick 事件侦听器的选项页面上生成为按钮。当用户单击按钮时,它会更新扩展存储中的颜色值。由于所有扩展文件都从该存储中提取颜色信息,因此不需要更新其他值。